Sunday 9 June 2013

Final Major Milestone 

Project 'Situation Engine' is a visual expose, informative and communication tool that enables clients, industry and trade professionals a perspective view in analysing stages of construction in a real time environment using CryEngine3. The project produces two 3D models, recreated from the Revit Architecture Sample model that will comply with the Australian Standards and the National Construction Code.

Project Result
The overall result allows clients to better understand and experience the stages within the engine.

Contribution

Over the course of semester one 2013, I have been very involved with 3rdiconstruct. My key contribution to the group was as a 3D modeller and to exporter to Cryengine3.  It wasn’t far into the project, where I understood the extensive scope and detail of the entire project. Starting with the site terrain, I was constantly changing the models to suite different types of excavation.
I also modelled backfill and made all excavations with a 30 degree batter.  This was done for both post footings and retaining wall for timber, and strip footings for concrete. Any errors or adjustments that occurred above ground closer linked back to the terrain so I had this in the back of my mind. 

I was then in charge for the ground construction of both the timber and concrete house. For timber I modelled a retaining wall with backfill, concrete footings, their reinforcement, Formwork, post anchors, ant cap, posts, beams, joists, flooring, bracing and various connecting brackets.  For concrete I was in charge of the strip footings, reinforcements, formwork and slab.

There where many occasions where I specifically needed to research and come up with new construction details such as for the fireplace and front veranda as well as type of post anchors connection and timber post grid. I made sure I also collaborated with other group members to reassure what i was doing was correct with Australian standards. This has made the final result much more realistic. 

For the timber construction model I also completed a sectional model of the house. This long section is a key aspect of the project showing the detail gone into the retaining wall and footings. Lastly I was in charge of arranging the timber model into 9 stages. Each stage consisted of various models in which I made sure could export to Cry engine. 

Reflection 

Looking back now that the project is complete, the situation engine project has expanded my understanding  of collaboration. I have first hand experienced a project that felt very much like a job for a company. I learn't that Jobs needed to be completed on time as they affected the group as a whole. I have also seen that turning up to meetings and asking questions has improved my individual contribution. Towards the end of the project I found that alot of time was spent working out limits for exporting, grouping models and organizing them systematically which I didn't expect. This has been a learning curve which i will take on to future projects.  

I have definitely improved my knowledge and gained an extensive range of skills which include: 
  • Better understanding of construction detailing & scheduling
  • Refined technical modeling skills
  • Organising and structuring content within a team
  • Working within a team to collaboratively achieve aims and objectives

Thursday 6 June 2013

Timber model section


After talking to the group we decided to do a long section through house. I was in charge of modeling and exporting this section so it was ready for Cry Engine. At first I thought that there would be a plugin that could slice the model however it was proven problematic by not slicing the model cleanly leaving some model groups behind.


 Next I decided to progress through the model a group at a time slicing them individually so it became a lengthy process. I did this by intersecting the faces of each group with a plane that ran down the section cut.    


Animation in Sketch up showing the final section. Matt helped me by modelling the internal wall with plasterboard and insulation in between.    


Organizing Timber Model into Stages for Cryengine  

Individual Layers in Sketchup


Once the timber model was complete. Both Matt and I had created around 50 layers each with different parts if the timber house.  I numbered the layers so that there was a correct order that mimics the construction schedule of a house. This will also make a simpler transition into cry engine as we would all understand the order they need to show/hide.   

Made into Stages that combine groups of models


After speaking with Russel and the group we decided to make the process more simple by showing groups of models because with construction, multiple things usually go on at once.

Stages are then shown as scenes with description of what they include. 


After writing the description of each stage of the timber house construction. This was given to Nikko to include in his HUD for Cryengine. The animation also helps Tim and other group members visualize what will be shown in real time at specific points of time. Shown below are the stages and their description.    

STAGE 1 :
Site Unexcavated & Cleared
-          The site is fenced off ready for construction.
-          Site is cleared of any obstructions

STAGE 2 :
Site Excavated
-          Excavation at rear of the slope for retaining wall (30 degree batter)
-          Excavate footing for retaining wall
-          Holes for Post footings are drilled out of the ground
-          Footings for brick wall supports and fire place also dug out 

STAGE 3:
Formwork & Reinforcing
-          Large Cylindrical pipes used for formwork for post footings
-          Plywood formwork  built around all other trenches
-          Steel reinforcing  placed within these excavations adding strength once concrete is pored

STAGE 4:
Pour Concrete & Build Retaining Wall
-          Concrete is poured into formwork and levelled off.
-          Posts anchors are set in post footings
-          Build block retaining wall
-          Placed perforated pipe around retaining wall and backfill around with gravel
-          Fix Ant-cap over post footings

STAGE 5:
Ground Up and Fireplace
-          Fix timber posts (150x150) to anchors
-          Build and clad brick fireplace which also acts as a bearer support for ground floor
-          Fix Timber bearers (300x75 x 2) to posts with bracket
-          Fix timber floor joists (240x45)  to bearers
-          Fix timber floor sheeting to floor joists
-          Timber posts bracing is tensioned

STAGE 6:
First Floor and Brick Supports
-          Build first Floor Studwork with Noggings, bottom and Top plates.
-          Included opening for Windows and Door Frames in Studwork
-          Build Internal Stair case from first floor up to second floor
-          Front Veranda Posts are fixed with brackets to Anchors and bearer brackets
-          Build and clad brick wall supports which also acts as a bearer support for Verandas

STAGE 7:
Second Floor
-          Build Second Floor Studwork with Noggings, bottom and Top plates.
-          Included opening for Windows and Door Frames in Studwork
-          Steel Frame for large Curtain Wall Window
-          Timber Posts for Verandas and Steel Structure Support fixed to anchors
-          Fix Front joists and floor sheeting
-          Fix Front  veranda bearers to Brick wall supports
-          Fix Joists across Studwork for second floor
-          Fix floor sheeting to joists
-          Fix bearers and joists for Back veranda 
-          Entry Stairs

STAGE 8:
Roof & Steel Structure
-          Fix Roof Joists and Rafters to Studwork
-          Metal Roof Sheeting
-          Steel Structure beams fix to timber posts
-          Roof Sheeting over front veranda

STAGE 9:
Details and Finishes
-          External Claddings
-          Insulation Batts
-          Internal Plaster Board
-          Doors and Windows
-          Railings
-          Fireplace Steel Chimney

SECTION

-          Long Section of house 


Image showing all Timber Stages from 1-9


Adjustments to to timber model 

Timber Posts Connectors 


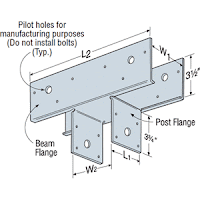
After researching different types of posts bracket I found a suitable bracket to tie together the ground floor posts and beams.  

Post Footings 


I decided to make the concrete posts footings cylindrical instead of a cube  This is a far more efficient technique for post footings as a cylindrical pipe can be slid into the hole as form work.

Formwork  


I then finished off the form-work for all the footings so that the concrete can be set in the ground with reinforcing. 
The formwork was different for every trench that the concrete needed to get poured into. Formwork was brought up higher than pour level so that there is no over-flow. 

Ant-cap & Concrete 


The Concrete for the cylindrical pipes, strip footings was then modeled as well as ant-caps for all the footings with anchors set in them. 

Fireplace as an engaged pier


The fireplace footing came into contact with one of the post footings. I resolved this by using fireplace as an engaged pier to support the beam for ground level floor. I was then able to remove the timber post from the grid. 

Fitting other models to base   


My Ground level and terrain model 

Matt's Stud work model 

It was then up to me to make sure Matt's Stud work model correctly aligned to my base with the ground floor, posts, joists and beams. After a few adjustments by moving in beams and posts it was perfect. I made sure that the terrain was not cut out until this process was done as when i moved posts in,  so did the concrete footings and reinforcing. One i was happy with the alignment i cut into the final terrain model. 

Excavated Terrain 


I then needed to make changes to the terrain as I decided that post footing would be drilled out with a cylindrical shape left behind.I also added footings for the brick wall supports on the far right of the house as well as towards the back of the house. It was important that this was the last step as any changes to beams and posts affected where the posts holes would be drilled out.     

Front Veranda and Stairs


The Veranda 


I spent most of my time fixing the Veranda so that it was supported properly. In each of the zoomed images i have shown a specific detail that I have come up with. As you can I have used the brick wall supports to hold beams into place which support joists. Posts are also arranged with anchors into the ground and brackets to ground floor beams.  

Adjustments to to concrete model 

Sunday 5 May 2013

Individual Major Milestone Checklist 

The following table shows the models I have been working on for our situation engine project. To date this makes up my individual Milestone and the majority of stage 1 they we set out at the start of the project. 

As we are creating two different models, the first being the concrete model which is: 

  • Revit sample model without changes 
  • The timber model which is the same house constructed in timber to BCA & Australian Standards 

A great deal of Research and time has gone into creating these models and they are constantly being updated after group discussions and decisions. I have gone into detail of my progress and modelling in my post Individual Major Mile Stone Below. 


Research


Building Construction Illustrated: Francis D. K. Ching

Sunday 28 April 2013


Week 8: Themes of Collaboration

Group Presentation 3: Intellectual Property (Interactive Architecture & GeriAmbiance ) 

For this weeks group presentations, two groups presented on the same topic of Intellectual Property. I found both groups to convey different ideas on the topic which kept both presentations interesting. 

Interactive Architecture took the conventional approach discussing terms and defining intellectual property by breaking it down into these categories:
  • Patents 
  • Trademarks 
  • Designs 
  • Copy-Right 
  • Other such as Domains, Common law and Circuit Layouts    
Interactive Architecture used various specific example which was good when differentiating the types of intellectual property. These example included the Toyota Hybrid, Apples Retina Display and the apple vs Samsung law suit which were all patents. These real example were most engaging and images accompanied on slides clearly portrayed what they were talking about. Images however where not referenced. 

GeriAmbiance with the second presentation took a very different approach by relating Intellectual property to their project. They proposed as if their project was a running business and the problems/opportunities they would face. For example when using things such as the Microsoft Kinect you need authorisation from its owners (microsoft). Also when using the Crysis SDK the user must also download copies to view projects as you do not have the right to ship and version out. An important point was put forward to Investigate into these permissions. The slides and images were not engaging and not really any example shown on screen.